Thursday, 7 April 2016

SharePoint 2013: How To Integrate BCS with Search


New Titles Added Weekly!

Introduction

This post discusses the overall process of incorporating external data into SharePoint 2013 Search by leveraging Business Data Connectivity Services (BCS). I have an end-to-end solution that integrates product data from a SQL Server database into SharePoint 2013 by using external content types. This is covered in my Search Walkthrough Guide as well as my Enhancing the Search Experience Guide. However, the detailed steps are also available on their own within my SharePoint 2013 Solution Series guides. (Sorting and refinement only appear in the larger).


Step 1: Prepare the Data Source

The first step is to create your read list and read item procedures.
  • Create a stored procedure that returns all of the information you want to search and make sure all rows are returned. 
  • Create a stored procedure that returns the same information but only for a particular entity by using the ID as a parameter.

Step 2: Add Credentials to the Secure Store Service

In order for the External Content Type to be created and BCS to access your external data source, the data source credentials need to be stored. The Secure Store Service in SharePoint allows you to store credentials. For my scenario, a SQL database account was created named “AWDBAccount”. Therefore an entry in the Secure Store Service needs to be added for SQL Authentication.

Step 3: Create an External Content Type

The methods I describe in my books provides the steps for a no-code solution in creating an External Content Type that uses your data source as the provider of information via SharePoint Designer 2013.

Step 4: Set Permissions on the BCS Entity

I can imagine that this is often an overlooked step. Once the External Content Type is created, you need to give permissions to it, otherwise the search account as well as users will not be able to access the data.

Step 5: Create a Content Source for the External Content Type

In order to crawl the external data, you need to create a content source in Search.

Step 6: Create Managed Properties

After the crawl has completed, you now need to create managed properties and map them to the crawled properties from the new content source. This may be accomplished from the Search Service Application UI or from PowerShell. I describe both methods in my guide books.

Step 7: Create a Result Source

Step 8: Create a Result Type

Step 9: Create a Custom Search Results Page

Step 10: Add the Custom Search Results Page to the Search Navigation

Step 11: Test the Results


The results won't look too pretty. The remaining steps involve creating custom search display templates to properly present the external data search results.


Step 12: Create a Display Template

Step 13: Create an Item Hover Panel

Step 14: Update the Result Type to use the Display Template

Step 15: Test the Overall Results


Conclusion

In just 15 simple steps you can integrate external data into SharePoint 2013 Search by using external content types and BCS. You can get the entire end-to-end solution steps in my guides or from my SharePoint 2013 Solution Series:

SharePoint 2013: Database Schema Version Issue using Move-SPSite

You may use Move-SPSite in SharePoint PowerShell to move site collections from one content database to another. However after applying updates and creating new content databases, when attempting to move a site collection, you may receive the following error:


Cannot complete the copy or merge operation because the database schema versions are different.
 
 
Sometimes you content databases do not get properly upgraded during the installation of a cumulative update or service pack. There is a quick an easy fix. Just use the Upgrade-SPContentDatabase cmdlet to update the content database:
 
Upgrade-SPContentDatabase -Identity <<content database name>>


Just for good measure, I usually run this cmdlet on all content databases - just in case. The system will let you know if the content database does not need to upgraded.

Once all databases are in sync, you may use the Move-SPSite as normal without any database schema errors!

SharePoint 2013: Hiding the Blog Tools Web Part

Problem
You want users to have contribute rights to your blog site but do not wish to show the Blog Tools on the post pages. If you remove the web part, other blog web parts (e.g. Categories) do not work. If you modify the Blog Tools web part properties and select the Hidden property, the web part still renders.

Viewing the web part properties in the page (via SharePoint Designer) shows that the web part should not be visible and should be hidden:
BUT IT STILL DISPLAYS ON THE PAGE!

Solution
Modify the Blog Tools web part properties as follows:


  1. Change the Height to a fixed height of 0 pixels
  2. Change the Chrome State to Minimized
  3. Change the Chrome Type to None


Click OK and Save (or Stop Editing) the page.

Refresh and the Blog Tools web part is still on the page but does not show!

SharePoint 2013 Search: Error Launching Query Builder - RESOLVED

Problem
When attempting to launch the query builder when creating a new Content Source or Result Source via Central Admin you receive an error as follows:
Error: Not able to connect to search service to retrieve valid settings.


Solution
You need administrator rights to the Search Service Application - even if you are a farm administrator. (I just recently encountered this issue but thought it worked before - I am thinking that recent patches and updates plugged a security hole).

Solution Implementation - PowerShell
You can solve this easily by running the following PowerShell script with your account name:

$principal = New-SPClaimsPrincipal "DOMAIN\USERNAME" -IdentityType WindowsSamAccountName

$spapp = Get-SPEnterpriseSearchServiceApplication

$security = Get-SPServiceApplicationSecurity $spapp –Admin

Grant-SPObjectSecurity $security $principal "Full Control"

Set-SPServiceApplicationSecurity $spapp $security –Admin 

Solution Implementation - Central Admin
You may also solve this via Central Admin.

From Application Management, click on the Manage service applications link under the Service Applications section:


Scroll down to your Search Service Application and select it:


On the SERVICE APPLICATIONS top ribbon, click the Administrators button:


In the Administrators dialog, enter the account that needs permissions and click the Add button:

Select the account in the list and grant Full Control:


Click OK.

The Query Builder dialog will now launch properly without any trouble.

SharePoint 2013: Image Preview in Search Results - Part II

This is the second post on previewing images in SharePoint search results. The first post is here.

In the first post I demonstrated a way to display image previews in search results and resolved two problems. But what about the images in a Picture Libary? I didn't see them appear in search results as pictures until I added the file types. Shouldn't there be special results for Picture types?

UPDATE: Get the source files here


Previewing of Images Stored In Picture Libraries

Problem #1: Images in Picture Libraries Returned as Files or List Items
After going through the steps in Part I , even images stored in Picture Libraries are returned as files themselves. The hover works fine but you should be able to take advantage of the image result type.

Solution to Problem #1: Copy and Configure the Image Result Type

In your Search Center site collection select Site settings from the settings menu:

Under Site Collection Administration, click on Search Result Types:


Scroll down and find Image. Use the drop-down menu and select Copy:


On the Add Result Type page, select Picture Item udner What should these results look like?


Click Save:
Run a search for an item in a Picture Library:


There is a preview image right in the results! That's great but that didn't happen in image results from other types of libraries - onto Problem #2.
 
Problem #2: Image Search Results Not Consistent
Now the results from a Picture Library and non-Picture Library look different. It is not consistent for the user:

Solution to Problem #2: Modify the Display Template for the Result. 
This time you need to edit the Item_Picture.html file.

Simply add an else statement to the if in the middle of the code:

 else {
           ctx.CurrentItem.csr_PreviewImage = ctx.CurrentItem.Path;
      }


(If you only see .js files, the .js code to  modify is at the bottom of this post)

Save the file and run a search again:


Now all images that are returned have a preview image in the results!!!!

But now the hover is the Picture Library List item hover, not the one I modified in the first post. So in the next and last post of this series I modify that hover to include a larger preview!


If you are not running search in a Search Center Site Collection and/or you only see .js files in your Search Display Templates, here is the resultant .js code to paste over after the render header in Item_Picture.js:

    if(!Srch.U.n(ctx.CurrentItem.PictureThumbnailURL) && !ctx.CurrentItem.IsContainer) {
     ctx.CurrentItem.csr_PathLength = Srch.U.pathTruncationLengthWithPreview;
                    ctx.CurrentItem.csr_PreviewImage = ctx.CurrentItem.PictureThumbnailURL;
       }
      else {
           ctx.CurrentItem.csr_PreviewImage = ctx.CurrentItem.Path;
      }


Wednesday, 6 April 2016

SharePoint 2013: Image Preview in Search Results - Part I

I was discussing SharePoint Search previews of images on Twitter with Jasper Oosterveld . 
The discussion made me look into image previews in search results. As a result, I looked at various options and functionality to this regard. I am splitting these posts into at least two parts so I can get part of my solution out as soon as possible. This post solves the previewing of images that are not in Picture Libraries.

UPDATE: Get the source files here

Previewing of Images Not Stored in Picture Libraries

Problem #1: Image Search Results Are List Items

When images are stored in "regular" document libraries such as Site Assets, they are uploaded as documents. When the library is crawled, the results are the actual list item and not the image itself. Even if you add the Image or Picture content type to the library and modify the item, the result is still treated like a list item.

Solution to Problem #1:  Add Image File Types to Search
The reason the images are coming back as items is because image file types such as .jpg and .gif are not in the list of the search file types.

So you need to go to Central Administration and modify the Search Service Application. On the left hand side click on File Types:


On the File Types page, click on New File Type:


Enter an image file type such as jpg and click ok:


Repeat the process for other image types you want to handle.

Now go to the document library that contains the images and select Library settings from the Library top ribbon:


On the Settings page, click on Advanced Settings:


Scroll down and find the Reindex Document Library button and click it:

 
In the dialog that appears, click Reindex Document Library:

Click OK on the Advanced Settings page.
 
Now return to your Search Service Application and run an incremental crawl on the main content source:
 
 
After the crawl is completed, the search results of the images should appear as their filename instead of a list item. That solves that problem but the hover is still the Default hover template and doesn't show an image preview.
 

Problem #2: Image Search Results Hover Doesn't Show Preview
Now that the search is crawling image types, the results display the image file but the hover is using the default item template and no image appears.
  
 
UPDATE: You do not need to go through the modification of the default hover although I did in the beginning before I figured out all that was happening. The overall cause of this issue is that Image result type uses the Default Item template and not the Picture template. My solutions in Part II and Part III explain how do implement this better.

 
Solution to Problem #2: Modify the Default Hover Panel Display Template
The solution here is to modify the hover display template that is being used for default items. This can be easily performed using SharePoint Designer 2013. Follow the steps to get to the Display Templates as I have outlined previously.
 
This time, edit the Item_Default_HoverPanel.html file. Replace the RenderBody section with the following code:

                <!--#_
                    if(ctx.CurrentItem.FileExtension == "jpg" || ctx.CurrentItem.FileExtension == "gif"){
_#-->
                        <div class="ms-srch-hover-imageContainer">
                            <img id="_#= ctx.CurrentItem.csr_id =#_" src="_#= $urlHtmlEncode(ctx.CurrentItem.Path) =#_" onload="this.style.display='block';" />
                        </div>
<!--#_
                }
                else {
_#-->
    <div id="_#= $htmlEncode(id + HP.ids.body) =#_" class="ms-srch-hover-body">
                    _#= ctx.RenderBody(ctx) =#_
                </div>
<!--#_
                }
_#-->


You may add more conditions for each file type you want to handle. You could also check the content type however, by default, the images loaded to Site Assets are documents. So if you want to capture all images I would use the file extension check.

Save those changes and then perform a search. Hover over the image results:


Voila!!! The hover shows a preview of the image!!!

But that's not all folks. If you have Picture Libraries you could have even better results and previews but then that change will negate the solution provided here. I discuss this functionality and customization in my Part II post.

Monday, 11 January 2016

SharePoint 2013 : How to Create Custom Intent Based Results Blocks Using Query Rules


In this post we will explore a new mechanism of Searching data based on Custom User Intents and serve them as Result Blocks on top of the Search Results.
By the way what is Custom User Intent?
Custom User Intent means matching a Search Term specified by the end user with the Phrases defined using Query Rules. For example, PowerPoint Slides are also known as Decks. So if the business user specified a Search Term as “SharePoint Deck”, it was really intended to search all the PowerPoint Slides which contains “SharePoint” as shown in the image below. 1
Hope the above example suffices to clarify the Custom User Intent.
Business Scenario:
For the sake of this demo, I have setup an imaginary scenario, where in my organization business users refer all types of videos as “Small Medium Sized Video” or “SMV”. As the matter of habit all users make use of keyword “SMV” in order to search for video files in SharePoint System.
In order to implement the Custom User Intent based on above scenario we have to follow the below steps:
>>Go To “Site Settings”
2
>>Under “Search” section Click on “Query Rules”
3
>>Create & Configure Query Rule
  1. Select the required “Result Source”, in our case we can go with “Local SharePoint Search Results”.
  2. Click on “New Query Rule” in order to create a new Query Rule.
  3. Specify rule name as “Custom Video Intent”
  4. Under “Query Conditions” “Query Contains Action Term” and specify the phrases you want to match to identify the User Intent, like we specified as “smv;smvs”.
  5. Click on “Add Result Block” to specify the query based on which Result Block will be rendered.
4
5
6
>>Configure Result Block
  1. Specify the “Block Title” as shown below
  2. Click on “Launch Query Builder” button to configure the query
7
>>Configure query
  1. Select result source “Local Video Results”
  2. Click on “Test Query” button to test the query based result source selected in Step 1
  3. “Search Result Preview” Section on the right will show the results returned as a part of the query specified earlier.
  4. Click “OK” to save the Query Changes.
8
>>Configure Display Templates
  1. Choose suitable Display Template from “Item Display Template” dropdown list.
9
10
And that’s it. We are all done with our new Query Rule defining Custom User Intent.11
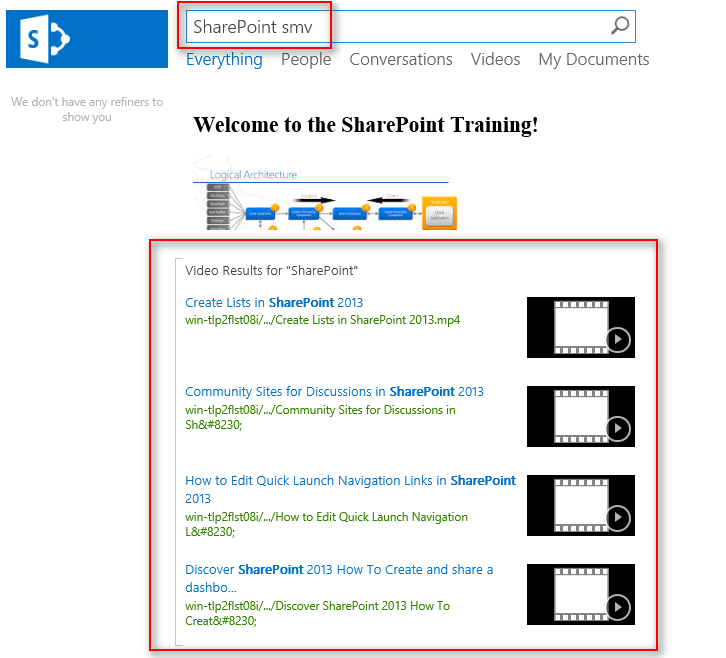
Now it is time to see the Query Rule in Action. In order to test it go to Search Center and enter “SharePoint smv” as search term and click Search Icon. You will see the Search Results Block “Video Results for SharePoint” containing items which contains “SharePoint” in their Title or Description.
12
Hope this will help someone in need…