Step by Step guide to Migrate from SharePoint 2010 to SharePoint 2013


Migration from an older version to a new one definitely poses as a need with features being added in newer versions. SharePoint 2013 is Microsoft’s new SharePoint version loaded with some great features. SharePoint 2010 version is very popular among organizations due its radical features and remarkable integration capabilities.
With the launch of SharePoint 2013, SharePoint’s market share and positioning has reached to a completely different level. However, SharePoint 2010 is still used across organizations and many of these organizations are looking forward to upgrade to the more powerful and immensely successful 2013 version.
If you also want to integrate SharePoint 2013 features into your network, then this guide is for you.
Before you start migration keep these things in mind:
- Update SharePoint 2010 farm with latest service packs/patches installed on your SharePoint 2010 farm
- Document farm configuration settings in SharePoint Server 2010
- Change your SharePoint 2010 web applications from classic mode to claims
- Cleanup environment by deleting unused site collection, removing unused features, and deleting orphaned users and sites. Also, cleanup old document versions and remove features which are not supported by SharePoint 2013
And, don’t forget to run database consistency check before taking database backup from SharePoint 2010 farm.
There is no direct upgrade possible from SharePoint 2010 to SharePoint 2013. So, the only way to upgrade is to migrate. You can’t reuse your existing Hardware for SharePoint 2013 and you can’t install both SharePoint 2010 and SharePoint 2013 on same machine.
Migration Steps:
1. Create New SharePoint 2013 Farm
The very first step in migration is to install and configure new SharePoint 2013 farm. Setup all farm configuration in source SharePoint 2010 farm and it should include all essential configurations such as AAM, Email settings, managed pats, etc. Then, install all the third party software, language packs, custom features and solutions of SharePoint 2010 farm into your SharePoint 2013 farm. Create web application similar to your existing SharePoint 2010 farm for SharePoint 2013 farm.
Since, we use the existing content database from SharePoint 2010, therefore, you can delete default content database linked with the new web application. If you fail to delete the root site database of the existing web application, running a Test-SPContentDatabase cmdlet as a part of migration process can result in orphaned site issues. This happens because the root site collection exists in both the content databases which results in conflict.
2. Backup and Restore SharePoint 2010 Database to SharePoint 2013 SQL Server
The second step is to create a backup of SharePoint 2010 content databases and after that restore them into SharePoint 2013’s SQL Server.
This can be done by two ways, either by using central administration or by using PowerShell cmdlet.
The second step is to create a backup of SharePoint 2010 content databases and after that restore them into SharePoint 2013’s SQL Server.
This can be done by two ways, either by using central administration or by using PowerShell cmdlet.
- By using central administration:
In order to retrieve all content databases of a particular web application you have to identify and make a list of all source content databases from central administration.
You can do it by following this path:
(Central Administration >> Application Management >> Manage Content Databases)
(Central Administration >> Application Management >> Manage Content Databases)

- By using PowerShell cmdlet:
Use the PowerShell cmdlet in order to retrieve all content databases of a particular web application.
Use the below syntax:
Get-SPContentDatabase -WebApplication “<Web App URL>” | Select Name
Create Backup
You can create a Backup of databases from SharePoint 2010 SQL Server by Log-in into the SQL server box of the SharePoint 2010 farm. And then, all you’ve to do is open SQL Server Management Studio and expand databases node.

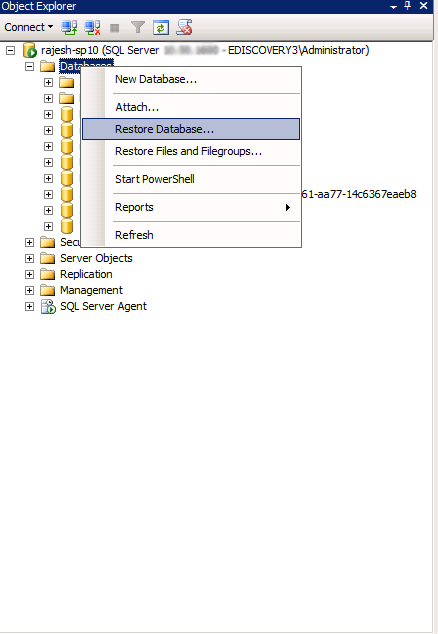
Restore Database
To restore all databases from SharePoint 2010 to SharePoint 2013 SQL Server, copy all required databases backup files to your target SharePoint 2013’s SQL Server. Once you have copied the database files, the next step is to open SQL Server Management Studio and click restore database.
To restore all databases from SharePoint 2010 to SharePoint 2013 SQL Server, copy all required databases backup files to your target SharePoint 2013’s SQL Server. Once you have copied the database files, the next step is to open SQL Server Management Studio and click restore database.

Simply execute PowerShell cmdlet: Test-SPContentDatabase cmdlet and scan content databases of provided web application in order to address any issue.
For this you can use syntax:
Test-SPContentDatabase -Name <Database name> -WebApplication <Web-App-URL>
Test-SPContentDatabase -Name <Database name> -WebApplication <Web-App-URL>
This syntax will report various issues such as missing features, solution dependencies, orphaned sites, wide lists, etc.
4. Run “Mount-SPContentDatabase” to attach content databases to SharePoint 2013
Once you’ve fixed all the issues reported by Test-SPContentDatabase, you can start attaching content databases to SharePoint 2013 web application. Always try to mount the root site collection’s database first and if you’re migrating ‘My sites’ then migrate its host first.
Once you’ve fixed all the issues reported by Test-SPContentDatabase, you can start attaching content databases to SharePoint 2013 web application. Always try to mount the root site collection’s database first and if you’re migrating ‘My sites’ then migrate its host first.
Mount-SPContentDatabase -name “Database name” -DatabaseServer “Database Server Name” -WebApplication “Web-App-URL” -confirm: $false
After mounting the content database to web application you can easily access site collection in SharePoint 2010 mode.
After mounting the content database to web application you can easily access site collection in SharePoint 2010 mode.
5. Upgrade Site Collections to move to SharePoint 2013
The last step in migration process is upgrading the site collections. After migrating from SharePoint 2010 to SharePoint 2013 by default, all migrated site collections will be on SharePoint 2010 with its old look and feel and other functionalities. Therefore, you’ve to explicitly migrate all site collections to SharePoint 2013. This can be done by Site Collection administrators by clicking on the links available from upgrade reminder banner.
The last step in migration process is upgrading the site collections. After migrating from SharePoint 2010 to SharePoint 2013 by default, all migrated site collections will be on SharePoint 2010 with its old look and feel and other functionalities. Therefore, you’ve to explicitly migrate all site collections to SharePoint 2013. This can be done by Site Collection administrators by clicking on the links available from upgrade reminder banner.
Get Upgrade Status:
Undoubtedly, upgrades are time consuming when there is a huge number of site collections present on the particular content database. You can easily get the status of upgrade from the “Upgrade Status” page in central administration page.
Undoubtedly, upgrades are time consuming when there is a huge number of site collections present on the particular content database. You can easily get the status of upgrade from the “Upgrade Status” page in central administration page.
Follow this path:
(Central Admin >> Upgrade and Migration >> Check upgrade status)
(Central Admin >> Upgrade and Migration >> Check upgrade status)

Here is the SharePoint 2010 site migrated to SharePoint 2013:

The Final site after site collection upgrade:

Thus, you can successfully migrate SharePoint 2010 to SharePoint 2013.
Even after successful migration there are various limitations associated with native migration method, such as:
Even after successful migration there are various limitations associated with native migration method, such as:
- It doesn’t support granular migration.
- It is very time consuming.
- Though, you can verify content before migration, but for that you should have knowledge various PowerShell commands.
- With it, you can’t migrate unlimited bulk content with utmost concurrency.
- Manual migration will increase chances of mistakes and data loss.
Due to these drawbacks, organizations that are looking to upgrade to SharePoint 2013 face various substantial planning challenges that limit both proof of concept and full implementations.
Fortunately, LepideMigrator for Documents – an automated solution to migrate content from SharePoint 2010 to SharePoint 2013 is designed to overcome the limitations of native migration method.
LepideMigrator for documents help you to avoid these risks by lessening the time and cost, while preserving the Meta data along with improving business intelligence.
Benefits offered by LepideMigrator for Documents are:
- Its installation and user interface are quite user-friendly.
- Not only content, but it also migrates Metadata automatically during migration.
- Easy remapping of users between Source and SharePoint Servers.
- It also migrates permissions from the Source to destination.
- It allows to schedule the migration jobs to create an unbroken one-way synchronization between two lists, libraries, or sites of same/different SharePoint Server. The selected destination will be synchronized with the new/updated content and objects of the source.
- Migrate large amount of content in bulk or perform granular migration to move only the content that’s needed.
Migration with LMD is as simple as:
- Add Source – Add SharePoint 2010
- Add Destination – Add SharePoint 2013
- Create Migration jobs to perform simple and timely migration. You can migrate site, list/library and items from source SharePoint to destination SharePoint.
- Schedule the content migration jobs from SharePoint 2010 to SharePoint 2013.
- You can also perform bulk migration of site, list/library and items using CSV files.
- With Migration history, view the stored records of all real-time migration jobs, scheduled migration jobs, and downloads from SharePoint.
Yes, migration can be that simple!
When you have such an easy and simple way to perform SharePoint migration, then why go for native migration methods. With LepideMigrator for Documents, organizations can have better control over the migration process and can solve a wide variety of common—yet complex—migration scenarios. And not just SharePoint to SharePoint migration, you can also migrate file servers and Exchange public folders to SharePoint as well.
When you have such an easy and simple way to perform SharePoint migration, then why go for native migration methods. With LepideMigrator for Documents, organizations can have better control over the migration process and can solve a wide variety of common—yet complex—migration scenarios. And not just SharePoint to SharePoint migration, you can also migrate file servers and Exchange public folders to SharePoint as well.


