Wednesday, 6 April 2016

SharePoint 2013: Image Preview in Search Results - Part I

I was discussing SharePoint Search previews of images on Twitter with Jasper Oosterveld . 
The discussion made me look into image previews in search results. As a result, I looked at various options and functionality to this regard. I am splitting these posts into at least two parts so I can get part of my solution out as soon as possible. This post solves the previewing of images that are not in Picture Libraries.

UPDATE: Get the source files here

Previewing of Images Not Stored in Picture Libraries

Problem #1: Image Search Results Are List Items

When images are stored in "regular" document libraries such as Site Assets, they are uploaded as documents. When the library is crawled, the results are the actual list item and not the image itself. Even if you add the Image or Picture content type to the library and modify the item, the result is still treated like a list item.

Solution to Problem #1:  Add Image File Types to Search
The reason the images are coming back as items is because image file types such as .jpg and .gif are not in the list of the search file types.

So you need to go to Central Administration and modify the Search Service Application. On the left hand side click on File Types:


On the File Types page, click on New File Type:


Enter an image file type such as jpg and click ok:


Repeat the process for other image types you want to handle.

Now go to the document library that contains the images and select Library settings from the Library top ribbon:


On the Settings page, click on Advanced Settings:


Scroll down and find the Reindex Document Library button and click it:

 
In the dialog that appears, click Reindex Document Library:

Click OK on the Advanced Settings page.
 
Now return to your Search Service Application and run an incremental crawl on the main content source:
 
 
After the crawl is completed, the search results of the images should appear as their filename instead of a list item. That solves that problem but the hover is still the Default hover template and doesn't show an image preview.
 

Problem #2: Image Search Results Hover Doesn't Show Preview
Now that the search is crawling image types, the results display the image file but the hover is using the default item template and no image appears.
  
 
UPDATE: You do not need to go through the modification of the default hover although I did in the beginning before I figured out all that was happening. The overall cause of this issue is that Image result type uses the Default Item template and not the Picture template. My solutions in Part II and Part III explain how do implement this better.

 
Solution to Problem #2: Modify the Default Hover Panel Display Template
The solution here is to modify the hover display template that is being used for default items. This can be easily performed using SharePoint Designer 2013. Follow the steps to get to the Display Templates as I have outlined previously.
 
This time, edit the Item_Default_HoverPanel.html file. Replace the RenderBody section with the following code:

                <!--#_
                    if(ctx.CurrentItem.FileExtension == "jpg" || ctx.CurrentItem.FileExtension == "gif"){
_#-->
                        <div class="ms-srch-hover-imageContainer">
                            <img id="_#= ctx.CurrentItem.csr_id =#_" src="_#= $urlHtmlEncode(ctx.CurrentItem.Path) =#_" onload="this.style.display='block';" />
                        </div>
<!--#_
                }
                else {
_#-->
    <div id="_#= $htmlEncode(id + HP.ids.body) =#_" class="ms-srch-hover-body">
                    _#= ctx.RenderBody(ctx) =#_
                </div>
<!--#_
                }
_#-->


You may add more conditions for each file type you want to handle. You could also check the content type however, by default, the images loaded to Site Assets are documents. So if you want to capture all images I would use the file extension check.

Save those changes and then perform a search. Hover over the image results:


Voila!!! The hover shows a preview of the image!!!

But that's not all folks. If you have Picture Libraries you could have even better results and previews but then that change will negate the solution provided here. I discuss this functionality and customization in my Part II post.

Monday, 11 January 2016

SharePoint 2013 : How to Create Custom Intent Based Results Blocks Using Query Rules


In this post we will explore a new mechanism of Searching data based on Custom User Intents and serve them as Result Blocks on top of the Search Results.
By the way what is Custom User Intent?
Custom User Intent means matching a Search Term specified by the end user with the Phrases defined using Query Rules. For example, PowerPoint Slides are also known as Decks. So if the business user specified a Search Term as “SharePoint Deck”, it was really intended to search all the PowerPoint Slides which contains “SharePoint” as shown in the image below. 1
Hope the above example suffices to clarify the Custom User Intent.
Business Scenario:
For the sake of this demo, I have setup an imaginary scenario, where in my organization business users refer all types of videos as “Small Medium Sized Video” or “SMV”. As the matter of habit all users make use of keyword “SMV” in order to search for video files in SharePoint System.
In order to implement the Custom User Intent based on above scenario we have to follow the below steps:
>>Go To “Site Settings”
2
>>Under “Search” section Click on “Query Rules”
3
>>Create & Configure Query Rule
  1. Select the required “Result Source”, in our case we can go with “Local SharePoint Search Results”.
  2. Click on “New Query Rule” in order to create a new Query Rule.
  3. Specify rule name as “Custom Video Intent”
  4. Under “Query Conditions” “Query Contains Action Term” and specify the phrases you want to match to identify the User Intent, like we specified as “smv;smvs”.
  5. Click on “Add Result Block” to specify the query based on which Result Block will be rendered.
4
5
6
>>Configure Result Block
  1. Specify the “Block Title” as shown below
  2. Click on “Launch Query Builder” button to configure the query
7
>>Configure query
  1. Select result source “Local Video Results”
  2. Click on “Test Query” button to test the query based result source selected in Step 1
  3. “Search Result Preview” Section on the right will show the results returned as a part of the query specified earlier.
  4. Click “OK” to save the Query Changes.
8
>>Configure Display Templates
  1. Choose suitable Display Template from “Item Display Template” dropdown list.
9
10
And that’s it. We are all done with our new Query Rule defining Custom User Intent.11
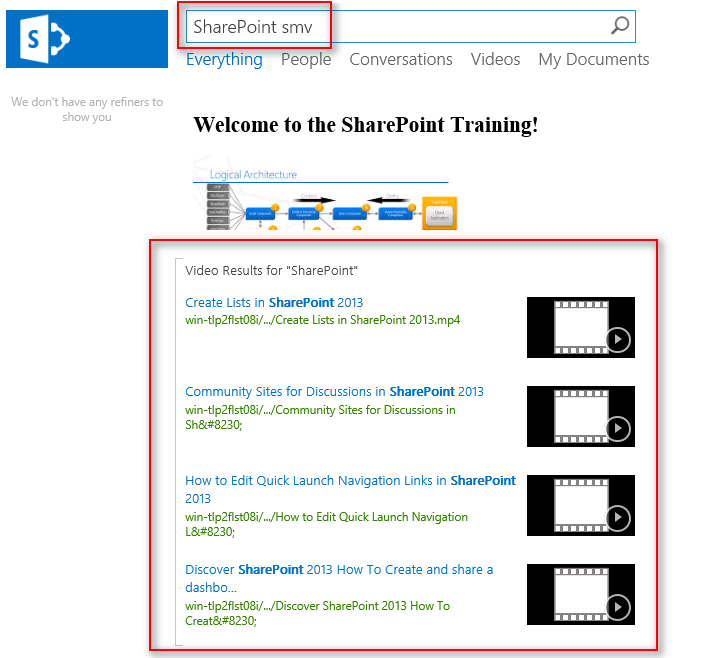
Now it is time to see the Query Rule in Action. In order to test it go to Search Center and enter “SharePoint smv” as search term and click Search Icon. You will see the Search Results Block “Video Results for SharePoint” containing items which contains “SharePoint” in their Title or Description.
12
Hope this will help someone in need…

Wednesday, 2 December 2015

part-4 SharePoint 2013 Variations - Creation and synchronization of content between source and target sites


Part 4: Content Translation

In this  Content Translation i used to Translate content from 

          ENGLISH -----------------------> ARABIC  LANGUAGE


Go to English variation  Site-->Add a page Ex:AboutUs.aspx 

Insert  some content in  that page


After completed   wait for some time because timer jobs are  running  to create  same page in   Arabic language also.....


Go to   Arabic site  and you find    About us page  in  site contents---> pages


if page is  not translated then   you have to check machine translation service is started or not.

if  machine translation is   started  then we need to   translate  particular to Arabic  language  by selecting that page and  in ribbon you can find the option  variation


Finally  Machine translation service  translated the  Content from English to Arabic Language

let's have to  look into AboutUs   page in  Arabic  site


Hope  you  understand...


Tuesday, 1 December 2015

Part-3 SharePoint 2013 Variations - Managed Navigation on variation site


Part 3: Managed Navigation on variation site


This post will explore a brand new functionality of SharePoint 2013, Managed Navigation and how Managed navigation works with a multilingual variation site.

Managed Navigation

The Managed Navigation feature in SharePoint Server 2013 enables you to build navigation for a publishing site that is derived from a SharePoint managed metadata taxonomy. In SharePoint Server 2010, by default, you could base navigation only on the structure of a site. To create site navigation based on any data structure, you had to create a custom navigation provider. By using Managed Navigation, you can design site navigation around important business concepts. Managed Navigation also lets you create friendly URLs without changing the structure of your site.
When a SharePoint 2013 publishing site is created SharePoint will also provision a local Navigation Term Set Site Navigation and also setup Global and Current Navigation to use Managed Navigation.

To view Site Navigation Term Set go to Site Setting-->Term Store Management. This Term Set is created by default and Intended use is set to Use this Term Set for Site Navigation.
SharePoint 2013 has two ways to add a publishing page, by going directly to pages library and using New Document button on ribbon or using Setting icon on top right corner and clicking "Add a page".
When a page is added using second method Add a Page. SharePoint will  by default create a page in Pages library and also create a Navigation Term in Navigation Term Set.
Navigation Term has assigned a Friendly URL and a Target page which is the relative URL to actual page (.aspx). Now users can simply browse pages by using friendly URL: examplehttp://global.contoso.com/about. Also Global and Current navigation on the pages is coming from Navigation Term set.

Managed Navigation on a Multilingual Variation driven site

Managed navigation is a cool feature in 2013 and it works great with Variations! In variation enabled site when Variation Hierarchy is created, SharePoint also creates a Navigation term set for each variation label and assigns it to a corresponding variation label navigation setting. Following screenshot shows default created Navigation Term sets for source and two target labels.
 
When authors create a page in source variation using Add a page from settings, a page will be created in draft mode and a navigation term will be created in source variation navigation term set. Once page is published and Variation Propagate Page job is run, source page will be propagated to target variations and also the term associated with source page will be reused in target Variation Navigation Term set. Navigation term in target label points Target Page URL to page URL of target variation. Content authors can also manually create page in Pages library and create a navigation term in source variation and assign Target Page. Variation page propagation takes care of reusing navigation term in target label. 


Variation Navigation term sets can also be easily translated by using SharePoint 2013 Machine Translation Service or by exporting Translation package.


Once content and navigation terms on target labels are translated, users coming from different locales will see the localized content and navigation!


part -2 SharePoint 2013 Variations - Creation and synchronization of content between source and target sites

Part 2: Creation and synchronization of content between source and target sites

In my previous post, we have discussed how to setup Variation site and create Variation labels. Once Variation labels are created the next step is Content Creation and Propagation. In this post I will focus on the same. In SharePoint Variation system content synchronization is a unidirectional process. The variations feature syncs content from a source variation site to one or more target variation sites. Following figure illustrates a source variation label EN and two target labels FR and DE. Any changes to content are flowing from EN source variation to FR and DE target variations.
Variation Timer Jobs 
The variations feature uses following timer jobs to perform tasks such as creating and propagating content.
Variations Create Hierarchies Job Definition   Creates a complete variation hierarchy by creating all variation sites, lists, and pages from the source variation site, based on the variation labels. By default, this timer job runs hourly. 
Variations Propagate List Items Job Definition   Creates and updates list items on target variation sites after a list is configured to send items to specific target variation labels. By default, this timer job runs every 15 minutes.
Variations Propagate Page Job Definition Creates and updates pages on target variation sites after a page on the source variation site is approved or after it is manually submitted by a user. By default, this timer job runs every 15 minutes.
Variations Propagate Sites and Lists Job Definition    Creates variation sites and lists when the Create Everywhere option is enabled. By default, this timer job runs every 30 minutes.

Create Hierarchy  

Once variation labels are created and Create Hierarchies is submitted on Variation labels page, Variation Create Hierarchy timer job will start as scheduled and will create hierarchy based on Hierarchy Creating setting, that was selected at the time of label creation. The process of hierarchy creation will finish after Variation Create Hierarchy timer job andVariations Propagate Sites and Lists Job has completed.
Following figure illustrates Variation label settings Hierarchy Creation options, the default option is to create Publishing sites, Lists with variations and all pages.


If default option is selected Hierarchy Creation will replicate source label structure and propagate content to all target labels. Custom Lists by default are propagated on target label. Please refer to Custom List and Libraries section in the Post.

Content Publishing Scenarios

Before we dive deep in technicalities of variations, let's discuss common content publishing scenarios in a variation enabled environment. 
In centralized authoring content authors create new pages or update existing pages on source label and target level automatically receives updates. These updates are always in draft mode on target variation so they wont be live until they are published. In some cases this approach can be a bit tedious for regional authors, because once a page from source label is published first time and propagated to target labels, content authors on target label will localize the page by translating and tailoring content to meet localization requirements. Now, if content of the page is modified later on the source page and republished, Variation System will create a draft version on all target labels. For example if the published version for a page on target label is 3.0 after propagation there will be a new draft version 3.1. The new draft page will be copy of source page and won't have any localization, so most of the times regional authors will have to delete the propagated draft to avoid confusion for content authors.
SharePoint addresses this situation by letting Admin configure variation labels and set Page Update Behavior to Manual update.

Setting Page Update Behavior to Manual update will not let variation propagation create a new draft on target label in case of republishing of source content. Instead, if an update to source content is published, content authors will see a notification that the source variation has been modified.

 
 Authors can click on View Changes to review the changes made on source variation and decide if they want to sync from source or keep the current one.


Sync from Source Variation

If content authors do not want to receive any update for a particular list of library they can go to list on variation tab and settings target label and set it to "Do not sync source list items to target list".


Custom list and Libraries

Custom lists and Libraries are by default not propagated to target labels. To propagate custom list/libraries, go to List and Variations tab, click settings and select labels where custom list needs to be created and synced. Once labels are selected, next Variations Propagate Sites and Lists Job Definition will create list in target labels.

 
 Once list/library becomes part of variation system, SharePoint adds a new Approval Status column to control publishing and propagation on List items.


In this post we have seen how content synchronization works with variations. In my next post we will discuss how Managed Navigation syncs with variations SharePoint 2013 Variations - Managed Navigation on variation site

SharePoint 2013 Variations - Creation and synchronization of content between source and target sites


 Following posts will guide through developing multilingual site using SharePoint 2013:
Part 1: Initial setup and configuration for variations site
Part 2: Creation and synchronization of content between source and target sites
Part 3: Managed Navigation on variation site
Part 4: Content Translation


This post will show how to setup variations on a SharePoint 2013 publishing site. Variations can be used only on sites that are created by using one of the Publishing site templates, or on sites with SharePoint Server Publishing Infrastructure feature activated. The first step is to create a Site Collection using Publishing Site template. 

Variation Settings


Navigate to Site Setting-->Variation Settings


On Variation setting page, Site, List and Page Creation behavior setting provides control over content synchronization from source to target labels. Create Everywhere is selected by default, this means any content created in source label will propagate to all target variations. There are few other self explanatory settings like Recreate Deleted Target Page,Update Target Page Web Part and Notification, which can be changed if needed, otherwise leave all settings to default and click OK.

Variation Labels


Next step is to create Variation Labels. SharePoint 2013 will assign first created label asSource label. 

When creating Variation Label, Language setting determines the language of the user interface on the variation site.
The locale setting assists with browser redirection and regional settings such as Sort order and Calendar. It does not affect the language of the user interface.
Not to be confused between Language and Locale settings, even if language packs are not installed,  Variation Labels for different locale can still be created and content can be translated into different languages. Language packs will only affect SharePoint user interface for content authors and admins.

In the example scenario under Locale I have selected English(United States) for my source label. Variation Home is the location site where sub sites for all labels will be created. Under Publishing Site Template there are two options, Publishing Site and Publishing Site with workflow. I have selected Publishing Site. However in most real time scenarios this will be Publishing Site with workflow, so that content authors can get approval using workflow before publishing the content.

Now that source label is created, next step is to create first target label. This time SharePoint will present a wizard like interface which is new to SharePoint 2013 and much easier to navigate!

Step 1. Configure your target label: On this tab Site Template Language will show the list of installed language pack to select.  However this is only required for Site Settings UI. Select locale for target variation.
P.S: Language packs are not required for creating target labels in different locales.


Step 2. Name your Target Label: This will show a default label name for variation label, that can be changed from this interface. Under Hierarchy Creation, default selected option is "Publishing Sites, Lists with Variations and All Pages", this option will build the label structure and sync all the content from Source Label.


Step 3. Translation Options: On this tab there are options to enable Human and Machine Translation. In this case I have  selected "Allow Human and Machine translation" and selected target languages. SharePoint 2013 provides industry standard support for manual and automated translation! I will explain content translation in my next post.


Step 4. Target Label Behavior: Page update behavior is useful when target variation owners do not want to get content updates automatically pushed from source label to target label. A scenario would be, after source label has pushed content for the first time and target content authors have translated/localized the content, then later if source label has changed, the target content authors may not want the content to sync automatically. Content synchronization is covered in detail in my post Creation and synchronization of content between source and target labels


Step 5. Review Label Settings: There are few settings which can not be changed once label is created, so make sure to review the settings and click OK. This will create the label but Hierarchy is still not created.

Creating Hierarchy: Creating Hierarchy is required first time when a new label is created. It is not required to create all labels to start with, labels can also be created in later stages. Sometimes hierarchy creation can take longer based on schedule on Timer jobs and also the amount of content and site structure on source variation.
Once labels are created next step is to click on Create Hierarchy on "Variation Labels screen" and wait for Variations Create Hierarchy Timer Job to run. This will copy the content from source label to target labels for the first time.

I have discussed Variation Timer Job details in my post Creation and synchronization of content between source and target labels

During the hierarchy creation several timer jobs run. All the logs related to this process are located under Variation logs. They provide great deal of details and are very useful in troubleshooting Hierarchy creation or Page propagation issues. 

Variation logs are located under root site settings.


Once Hierarchy is created, "Hierarchy is Created" status on Variation Label page will change to Yes. This means labels are created successfully and ready to browse!
We will discuss content creation and synchronization details in my post Creation and synchronization of content between source and target labels

Monday, 2 November 2015

how to fetch values from list and inserted into custom form

private void LoadDefaultData()
        {
            string requestedby = SPContext.Current.Web.CurrentUser.Name;
            string loginid = SPContext.Current.Web.CurrentUser.Email;
            this.txtRequestedBy.Text =requestedby;
            this.txtPRId.Text = String.Format("{0:s}", DateTime.Now).Replace(':', '_');
            this.txtDate.Text = DateTime.Now.ToString("yyyy-MM-dd");
            LoadPRForm(loginid, "Employees");

}

 public void LoadPRForm(string loginid, string lstname)
        {

using(SPSite site=new SPSite(SPContext.Current.Web.Url.ToString()))
                {
                    using(SPWeb web=site.OpenWeb())
                    {
                        SPList lst=web.Lists[lstname];
                        SPQuery query=new SPQuery();
                        query.Query = "<Where><Eq><FieldRef Name='UserName'/><Value Type='Text'>" + loginid + "</Value></Eq></Where>";
                        query.ViewFields="<FieldRef Name='Title'/><FieldRef Name='Department'/><FieldRef Name='Company'/>";
                        SPListItemCollection lic = lst.GetItems(query);
                        foreach (SPListItem item in lic)
                        {
                           txtDepartment.Text = item["Department"].ToString();
                           txtCompany.Text = item["Company"].ToString();
                          //hdnEmpNo.Value = item["EmployeeID"].ToString();
                         
                        }
                    }
}